Wednesday, April 11, 2012

A Nice Spring Day

Today was a beautiful day outside!  Not too hot, not too cold.  I decided to tackle some yardwork, and my arms and hands are feeling it!  We have a big tree in our front yard that has branches that hang pretty low - and every time I mow the lawn, I get whacked in the face by them.  Today, I said goodbye to those branches and cut them down with a saw!  Then I mowed our front yard for the first time this year.  It was great to not have branches hitting me in the face while going around the tree!  And the bonus is that I park under that tree, so I no longer have to worry about those branches scraping up my car if it gets windy! 

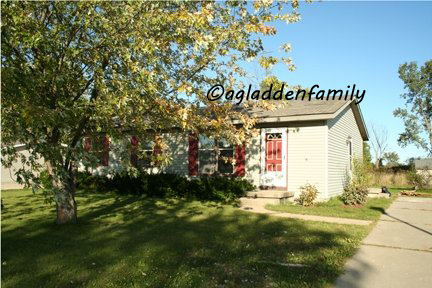
This is before - WAY before :)  I didn't take a before picture today - so this picture is from 2009 - before we bought the house!

This is after - it's really hard to see the difference since the tree isn't in full bloom - but there is one :)

Here is the proof :)  These are most of the branches that I cut off.

My arms are so incredibly sore from the sawing and then the pushing!  We have a reel mower, no power anything, so it's a workout!  I love the work out feeling though, and knowing that we don't have to pay for a tune-up or for gas/oil every summer is a double bonus :)

Yay for a beautiful day and for motivation!

Friday, March 30, 2012

Kitchen Faucet Fix

I'm so thankful for the internet and people who take the time to post how-to tutorials!  Our kitchen faucet has been leaking for a long time - at least a few months, if not longer.  We didn't have the extra money to call in a professional so there it sat, leaking every time we turned the faucet on.  Today, I finally became fed up.  I searched online for a 'how to' video and found one!  It was so easy!  I fixed our faucet by myself in less than a half hour!  I'm so glad I didn't call a plumber because that wouldn't have been a complete waste of money!  My next fix it project is our bathtub faucet.. it leaks worse than our kitchen faucet does.  But I'll be honest - this fix scares me A LOT!  It seems a lot more complex than my kitchen, but I will tackle it... eventually - when I get fed up with it :)

Here is the 'how to' that I watched: http://www.ehow.com/video_15854_fix-leaky-faucet.html

Tuesday, March 20, 2012

T shirt skirt & sandals

Oops, I've been home for a week!  And in that week, I decided to do some crafting and thus making my living room and craft room a mess... again!  I really should learn how to pick up after myself ;)  Anyway, last summer, I made a navy blue t-shirt skirt and I absolutely love it!  I bought a really cute button up t shirt while in Denver that matches perfectly.  However, I did not have any sandals to wear that match... and I spent all my spending money while in Denver :)  Pinterest to the rescue!  I found a blog that shows how to make your own sandals from flip flops that hurt your feet, so I tried it!  And I LOVE them!
Pictures and a how to?!  Sure, why not :)  In fact, I'll do two in one post, first I'll link you to the blog for the skirt - I don't have the pictures along the way, so I'll let the original blogger show you :)

The Skirt (The picture is of mine)
This is the blog that I found the tutorial on: http://sewlikemymom.com/the-shirt-skirt/

On to my shoes!!!
I found the idea on pinterest, thanks to this blog: http://annekata.com/2010/07/make-your-own-summer-sandals/

Here is the step by step, how I did it :)  I used hot glue, only because that was all I had.  When I get waterproof stronger glue, I will reinforce them.  They did hold up during my night out though!

This is the original pair of flip flops.  I LOVED them, but the plastic straps rubbed on my pinky toe and *always* gave me blisters.  I tried my hardest to wear them year after year, hoping that my skin would harden and not blister and every year, I'd get big blisters!
I started by cutting off the plastic strips down at the base.
This is what they looked like after I cut the straps off.
Using the left over t-shirt from my skirt, I cut 4 wide strips for the straps (2 for each shoe) and then 4 long skinny strips to be used for the ankle straps.
I measured 1 1/2 in long lines in the base of the shoe.  2 on each side.  These are where the wide straps will be placed.
The arrows point to the two lines on one side.

I took a utility knife (you could use a craft knife) and slit open where I drew the lines.

I put hot glue in the strip first (not shown), and then I pushed one edge of the wide strip into the slit with the corner of my ruler.  After I shoved the fabric in, I added more glue on top of the fabric and then on the bottom.

I repeated the last step 3 more times for each shoe.  I crossed the straps to create an 'x' (much like how the plastic used to be). 

This is the top view after both were done.

These are the ankle straps.  I pulled the strips of fabric tight, so they curled up and stretched out.  I tied two together to create one ankle strap.  In the end, I made two long straps from 4 short ones.

Underneath the heal, I glued the knot to the shoe.

The strap comes up and ties around the ankle.  When I tried the shoes on, the wide straps in the front had stretched and were way too loose.  My feet kept sliding out of them.  It took me a good hour of trial and error to figure out how to tighten the straps without pulling them out and re-glueing them.  I forgot to take pictures of the trial and error part, however I did get a picture of the final outcome :)
Again, this is the final!

You can see, I took the original flowers and added them to these.  I finally tightened the straps by pulling them in at the 'x' and safety pinning them.  Then I cut out two more thin strips and pulled them tight.  I looped those around the pins and tied them into the original ankle strap.  The flower was the perfect cover up for the ugly fix :)  And because they were made from the same t-shirt that my skirt was, they match perfectly!!!

Tuesday, February 28, 2012

DENVER!!!

I left Sunday morning and boarded the Amtrak at 7:30am.  I arrived at Denver yesterday morning at 7:15am.  I had a very good trip, met lots of fun people on the train and in the station during my layover.  I'm enjoying every minute of seeing my family out here and spending time with them!

I realized that I never updated with pictures of my clean craft room and living room.  I did clean them, I promise :) I just forgot to take pictures and post them.  I will when I get back though, no worries :)

Thursday, February 23, 2012

The Nightmare in my office/craft/guest bedroom Part 2

Okay, okay, this is part 3 technically since I updated on the last post ;)  Today, I was feeling better, so I started tackling the project.  It's about half way through and I'm happy to report that I now have a path through my living room and I have 1 garbage bag full of trash and 1 1/2 boxes full of stuff for my garage sale.  I still have the other half to go, but it's late and I need sleep :)  This project will continue tomorrow evening, and until it is finished.  And it better be finished by Saturday night! :)  Sorry, no pics yet... when it's done though, I promise!

Tuesday, February 21, 2012

The Nightmare in my office/craft/guest bedroom

Yesterday, I tackled the kitchen.  I got caught up on all the dishes.  I deep cleaned our refrigerator, which has been needing attention for months!  I scrubbed our sink, counters and stove top.  My motivation - my mom and dad were possibly stopping by ;)  In the end, they didn't end up coming over, and hubby's response? "I'm going to call your mom and tell her to make plans to possibly stop over once a week." :D  The kitchen has grossly needed this attention since I quit my job in December, yikes!  Hopefully now, I'll be able to keep it clean and it won't take me as long (4 hours yesterday!).

Today, I'm tackling the living room and my office/craft/guest bedroom.  I'll have before and after pictures for this project, even though I'm slightly... ok REALLY embarrassed by the condition I've let it get in!  This also includes my living room, because during the bathroom redo, I pulled out my craft stuff to work in the living room while watching movies.  On top of this, I have piles of stuff that is waiting to be sold, either on craiglist or ebay, sitting in the corner of our living room!  So today's motivation?  I'm telling the world about this mess I've let sit for way too long, and I need to redeem myself (and my sanity) :)

--------------------------------------------------------------------------------

Update:  This task will have to be continued tomorrow :(  Unfortunately, medical issues decided to consume my life today, and I've ended up on the couch... I'm sorry in advance to my hubby, who has to walk through a maze in our living room.  See, I emptied out the spare room and got it dusted and vacuumed.  I emptied it all into the living room, so that is where it lies... until tomorrow (prayerfully, I'll be feeling better tomorrow!)

Monday, February 13, 2012

Homemade Chocolate Peanut Butter Caramel cookies

Earlier this week I found a bag of vanilla wafers in our pantry.  I decided I was going to try making homemade Chocolate covered Peanut Butter Caramel Cookies similar to a Peanut Butter Twix bar.  I was less than thrilled with the results, but at least I learned what doesn't work :)  They taste yummy, they are just hard as a rock and impossible to get out of the cupcake paper liner.   Here's how I made them.

This is what I started with: 10 individually wrap caramals, peanut butter, semi-sweet chocolate chips and vanilla wafers.

I filled the bottom of the cupcake papers with chocolate chips.

I spread the peanut butter on the vanilla wafer and then put it on top of the layer of chocolate chips.

Then I placed one unwrapped caramel piece on top of the wafer with peanut butter.

I put them in the oven at 200* for about 5 minutes.  Just long enough to melt.

This is what they looked like after I pulled them out of the oven.

I layered another handful of chocolate chips on top.  And put them back in the oven.  Again for about 5 minutes - just long enough for the chocolate to melt.

This is the final 'cookie'.

It's extremely delicious, just a pain to eat :)  Next time I'll have to use milk chocolate instead of semi-sweet and I think instead of melting them in the oven all put together, I may melt the chocolate first in the bottom.  Let it harden, then add the cookie and the peanut butter.  Then melt the caramel and pour it over the peanut butter and cookie.  Let that harden.  And lastly melt the last bit of chocolate and pour over the top and then let it harden :)  Hopefully then, the caramel won't be rock hard and maybe then it won't all stick to the liner! :)

Feel free to comment with any ideas that you may have to make it better too!