Friday, February 24, 2017

Kitchen Redo #2

Phase 1

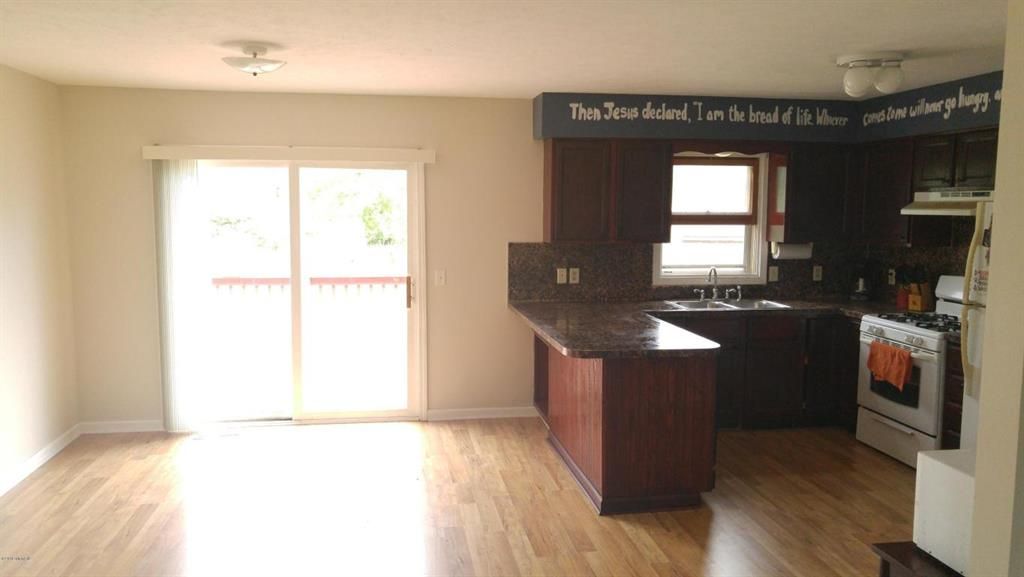
Our kitchen is... not pretty... yeah, that's how I'll word it.  The upper cabinets are a mint green (my husband says they're blue) and the lower cabinets are an ugly brown.  I prefer rich colors.  From the first day I saw the kitchen, I knew I wanted to repaint and stain the cabinets!  Thankfully the counters are pretty decent!

Before pictures


Blue, or green? :)

I didn't want to spend a lot of money on this project, especially since this isn't our forever home and I'm going to school and not working currently, therefore we are living off just my husband's income.

Thankfully we have a TON of random opened paints.  I decided I wanted to go with a light color, possibly gray for the upper cabinets.  I found a light beige in a 5 gallon bucket that I had used to paint the walls in our old house.  I also still had the blue left over from that kitchen.  I love the look (and ease of use) of chalky paint.  I recently bought plaster of paris from Walmart for less than $5 (I think) and Chip Paint Brushes from Dollar General for $2 (for 3 different sizes!).  Today I bought a glass jar for $3 to store the mixed paint color in because I knew I wouldn't be using it all up today.

So mixing fun I had!  1 1/2 cups of beige to roughly 1/3 cup blue.  I actually used 5 Tbls of blue because I wanted to add it 1 Tbls at a time to make sure the color didn't turn too blue or too dark.


The recipe I use for chalky paint is:
2 1/2 Tbls Plaster of Paris
2 Tbls cool water
stir and mix until smooth - adding more plaster for thicker, chalkier coverage
1 cup of paint
mix all together


Because I only wanted to test one bank of cabinets to make sure I liked the color, I only wanted to mix 1/2 cup of paint.  So I only used 1 1/4 Tbls plaster and 1 Tbls of water.  After the mixture was smooth, I added 1/2 cup of my newly mixed color.


The thing I love most about chalky paint is that prep is super easy!  I took the cabinet doors off, and then the handles off the doors.  I wiped them down using a degreaser and let them dry.  On goes the first coat.  


The second coats have been applied.  I'm waiting on the doors to dry so I can flip them and do the back side.  Each coat only takes roughly 30 minutes to dry (another bonus of chalky paint).  I'm anxious to see the color tomorrow morning after it has dried and in the sunlight!

Thursday, February 23, 2017

Laundry

Our house has a utility room that is home to our wash machine, however, we do not have the correct connections for the washer or a vent for a dryer.  While my husband and I jimmy rigged our washer so that I could wash clothes, we still don't have a dryer.  And actually, I can no longer use the washer because our jimmy rig failed haha.  BUT, when I could do wash at home, I needed a place to dry.  In South Carolina, the weather is decently warm for 7-8 months out of the year so I figured a clothes line would work.  I did not want to spend a lot of money on one though, especially since we are planning on purchasing and hooking up a dryer - eventually.  So, I put my creativity to good use and off to Home Depot or Lowes (I can't remember haha) I went.  I purchased PVC pipes and connectors and cement rebar.  We already had rope, pvc glue, and garden stakes at home.
 I used a hand saw to cut the PVC pipes to size and a drill to create holes for the rope to be tied through.
I drove the rebar poles into the ground about a foot, and then placed the long PVC pipe over it.  This gives it support and also holds it to the ground.  It is a little flimsy and doesn't hold a lot of weight, however it works for now.
 The garden stakes were added to help support the PVC pipe.  After loading the clothes on the line, the pipes would bend inward without the extra support.  For less than $25, I have a clothes line.

Monday, January 30, 2017

Michigan House - Complete Kitchen!

I figured it's about time that I show what the final kitchen turned out to look like :) It's only a few years overdue!  Granted, the process took a few years to complete!  The cabinet bases were stained in 2012, the doors were off and took until the Summer of 2013 to complete.  Finally in 2016 I added the knobs/pulls and redid the floor updated the flooring!


These aren't the best of 'after' pictures, but I can't do any better because we sold this house already :)  All in all, I loved how that kitchen turned out.  I'm excited to tackle the kitchen of our new house.  Thankfully I don't have to redo the counters!

Sunday, January 29, 2017

Starting Fresh

Where do I even begin?  My last post was written over 4 years ago!  Since then, I finished our kitchen, replaced the laminate wood flooring, all the doors and added storm windows.  Then we sold that house! I started school, quit my job, Aron got a new job and we moved!  But, let's go back and catch up.

In 2012, I started working full time for Spectrum Health in Nutrition Services and I worked in that department for 3 years.  In 2015, I was offered a position in Patient Services doing registration.  Aron's job with Pepsi ended, and he became an Assistant Manager at a local pizza place.

In 2014, we took a vacation to Greenville, SC to visit his brother.  We quickly fell in love with the area and decided that we wanted to make a plan to move there and it became our 10-year plan.

In January 2015, I decided to go back to school to get my Associates in Business Administration.  I would start classes in May.

In April 2015, I flew to Florida with my mom, and we drove my aunt's car back to home.  We spent the night near Orlando, I stayed with friends and my mom stayed with my aunt.  Mom and I then drove over to the Atlantic coast and up making our way through Jacksonville to visit more friends, then stopping in Savannah GA for some tourist attractions.  After Savannah, we headed to Greenville for a few days to spend with Aron's brother and his fiancĂ©e and pick up my dress for their wedding.  While visiting, I was also able to catch up with one of my best friends who had moved there years ago.  Mom saw why Aron and I fell in love with Greenville!  We drove through Gatlinburg TN on the way home - and it tooks us 7 hours to get through because of the Classic Car Show in Pigeon Forge and another event in Dollywood!


In June 2015, Aron and I went back to Greenville for his brother's wedding.  We drove down and ended up stranded in the mountains in North Carolina.  Our car died and we had to leave it there.  His brother rescued us at 4 in the morning!  We very much enjoyed the wedding festivities and officially welcoming my new sister into the family!  We then had to rent a car to get home!


In December 2015, Aron was offered a full time job working at a chemical manufacturing company - in Greenville SC.

January 1, 2016 we moved Aron down to SC.  He stayed with his gracious brother and sister-in-law until we were able to find an apartment or house.  That process ended up being a long 6 months, but we found a house and he moved in July.  In the meantime, I still had school.  We still had our house in Michigan and so we lived apart from each other.  I have made a few trips down to visit, some longer than others.

In May 2016, my mom, two of my aunts and I hauled much of our furniture and other belongings so that Aron could get settled as soon as we closed on our house.

I left my position with Spectrum Health in June 2016 to allow me to focus on school and to be able to travel between Michigan and South Carolina.

In July 2016, I moved pretty much the remainder of our stuff along with our two kitties.  Leaving the bare minimum in our house in Michigan.  This allowed me to update the house easier and have an almost empty house to show.

Over the course of the next few months (July through October), I made the 13 hour drive a few times.  Between selling our Michigan house and starting Fall classes, I pretty much lived out of a suit case and in my car haha!  After we sold our house, I still had to finish classes so my dear friend is allowing me to crash at her place.  I will graduate in April 2017, and this semester I have all online classes which is allowing me to spend the majority of my time with my husband in South Carolina.  I can't wait for school to be done, and for me to officially be able to say see-you-later Michigan!  And I'll only have to go back to visit for fun! 

That is a long post catching you up on where we are today.  I'll post more details about certain events and making our new house into our home on later dates!

Tuesday, September 25, 2012

Time is slipping away!

So, I started working full time again about 2 months ago.  Since then, my kitchen has been on hold.  We've been drawerless (living out of boxes) and doorless since then.  I at least have the upper cabinet bases finished, stain & poly-ed.  The lower bases are stained, I just have to add the poly.  The hinges and shelve brackets are spraypainted. The part I'm looking foward to the least, and the reason that I haven't finished it yet is the doors and drawers.  They need to be scrubbed - HARD - to get all the grease and nastiness off of them before I can go any farther.  Then they have to be drilled for the new knobs.  Some day my kitchen will be done and it will be beautiful.  Until then, I just have to take each step - one step at a time and slowly work on it, while trying to keep the rest of my house a home while working full time :)

Saturday, June 2, 2012

Everything's Coming Up Roses

I noticed last week that my roses were starting to bloom.  Today, I went outside and they are full and beautiful!  I thought that they had been killed in a frost - but they survived!
Fullest Bush - with white peonies falling over it

Smallest bush - this is the one that my nieces gave me last year for mothers day!  I love that it survived being transplanted *by me*!


Sunday, April 15, 2012

Kitchen Makeover - Phase 1

I finally decided to start the kitchen makeover process.  After all is said and done, the counters will be painted and the cabinets stained a different color.  Since we moved into the house, I've wanted to redo the kitchen, we just never had the funds to do so.  Last winter, when looking around on pinterest.com, I came across a $250 kitchen makeover that looked amazing!  She painted her laminate countertops and stained her cabinets.  My husband and I agreed, that we could afford $250 to redo ours the same way.  Phase 1 was the counters.  They have been completely redone by paint and polycrylic!  This is how I did it.
Before

Nasty old countertop!  When we bought the house, the counters were stained - in the two years that we've lived here - we've added to it!

The edge of the laminate was falling off.  I found some all purpose construction glue, and glued it back on.

I didn't like the metal trim that we had, and decided I was going to remove it all.  This turned out to be a VERY bad idea!  I *almost* ruined this piece of laminate.

I did finally remove this one piece of trim, cracking the laminate in the process.  Thankfully the construction glue held this together as well! *phew*

First I cleaned the counters really good with a degreaser & an antibacterial cleaner.  Then I sanded the surfaces, by hand!  I used to have an electric hand held sander, but I couldn't find it - so by hand had to work... and it did, it just took me longer.

For almost three weeks, this was our 'counter' space.

I HATE painters tape... not the tape, but the process of taping!  I'm really glad I took the time to tape everything off though!  Saved me a lot of hassle with cleanup!

These were the materials used.  Tinted primer, polycrylic, and 11 2oz acrylic paints (5 not shown - I had to purchase later).  Also not shown are a 4 in paint brush, 1 1/2 in paint brush, 1 regular circle craft sponge cut into thirds, and 3 sea sponges of different sizes.

After I sanded the counters, I wiped them all down again to get the dust off.  After they dried, I applied two coats of primer.  This color serves as the base.  Unfortunately, I picked out the wrong color.  We had decided to go with a dark base originally, and when I picked out the paint colors, I forgot and went with a lighter color.  In the end it all worked out though, thankfully!

All primed!

First I started with just a regular sponge.  I had it cut into thirds and applied my first of 9 colors.  There is no rhyme or reason to the pattern, just sponge away!

Still using a regular sponge, I added in the second color.

Then the third.  This gave me the base of all my browns.  However, I decided that I really didn't like the look of using the regular sponges and maybe the orginal poster had a reason for using a sea sponge.  So off to the store I went to find some sea sponges.

What a difference the sea sponges made!  The speckles were a different pattern and made it look more blended and stone like.  When I bought the sea sponges, I also bought black acrylic paint to make it darker (to make up for the light base).  This first dark color, I actually mixed black and dark brown so that it wouldn't be jet black.

Using the sea sponges for the rest of the colors, I added in orange, green and blue (those are the main colors of decor in my kitchen, dining & living rooms).

The first time I *thought* I was done.  My husband didn't think it was dark enough yet though.


So I went BACK to the store, and bought more black, brown and added in a red (by request of husband).  This is where I started to darken it, even more.

After I darkened it.  All in all, I went over the entire area about 20 times!  Between a total of 9 different colors, at least twice - once as a base, and then a second and or third time to accent/darken.

Before I applied the polycrylic.

After the polycrylic.


Right now, the backsplash has 3 coats of polycrylic and the countertops have 6.  However, per husband's request, each will be getting about 4 more coats.  He doesn't think the tops are smooth enough yet and the backsplash is shiny enough yet.  The polycrylic and primer were both applied using the paintbrushes.  You could roll the primer for a quicker step and to make it more even, but I couldn't find a roller, and really didn't want to spend more money than I had to.

All in all the cost breaks down as this:
package of 3 sponges and the first 6 acrylic paints: $1 (Michael's had a GREAT $5 off of a $5+ purchase coupon)
Tinted Primer $18
Polycrylic $44
Sea Sponges $6
5 added acrylic paints $3.50

Total for counters: $72.50
Plus I have a $5 rebate coming back for the polycrylic that I will use towards the stain for the cabinets.  I have OVER half of the primer and polycrylic left as well :)

The reason I didn't show a full kitchen view of the final is because the cabinets have yet to be done, and I want to show off the full kitchen after those are done :)

Here is a link to the original blog that gave me the idea.  I don't know how they did the counters for $20 - unless she already had the primer and polycrylic... http://prettylilposies.blogspot.com/2010/11/250-kitchen-makeover-with-20-granite.html
~~~~~~~~~~~~~~~~~~~~~~~~~~~~~~~~~~~~~~~~~~~~

Update May 18, 2012:
  We still cannot use our counters.  The tentative date that we will be able to use them is 7/4/2012.  There are 10+ coats of acrylic and it still is not covered evenly without blemishes.  The painters tape ripped off part of the acrylic & paint (down to the original countertop) when I removed it.  And I couldn't remove it while it was still wet because of so many layers needing to be done.  Am I happy with the color? yes!  Am I happy with the final product? Not yet!  Would I do this again?  Probably NOT!

Oh yeah, and I've used almost the entire can of acrylic now!
~~~~~~~~~~~~~~~~~~~~~~~~~~~~~~~~~~~~~~~~~~~~~~


Update May 25, 2012:
The counters are officially done.  I'm happy with the final product (it's still not perfect, but neither am I, so it will have to work - plus I'm sure no one else will notice the imperfections) :)  Still can't fully use the counters until July 4, but at least I can see the light ;)